For Data Scientists getting into LLMs and Vector Database: a line-by-line explanation of Weaviate Tutorial #1
In this post, I’m writing out line-by-line explanations for implementing vector database with Weaviate. The code follows a quick-start tutorial on Weaviate’s official website.
This posting is dedicated to those who are beginners in using APIs in Python so it’s explaning every single line in a tedious, overly-kind manner. I found a few of my friends in data science are getting into utilizing LLMs and along with that, storing their data in vector database but not quite used to programming in Python other than data analysis. This is for you!
If you’re already familiar with coding in Python and using various APIs, you can simply follow the official website. I would also recommend using ctrl + F to read about a specific property that you want to understand.
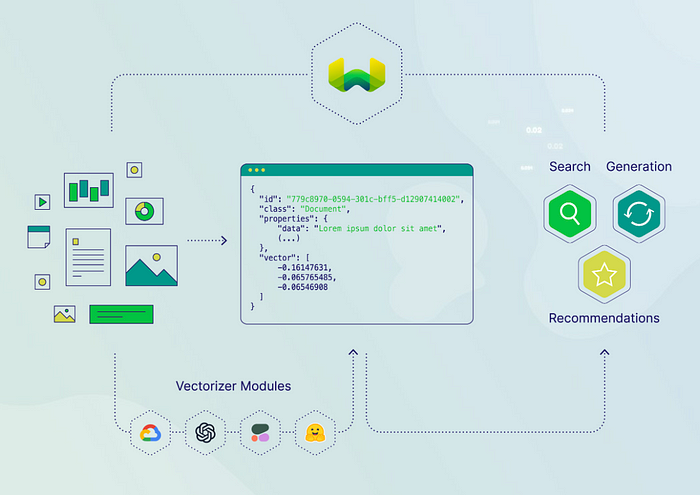
If you’re still not sure what a vector database is,
I will respectfully redirect you to this article and this podcast. If you are here because you want to use it with LLMs, read this.
If you are not sure which vector database you should be using, here’s a short answer: Weaviate or Pinecone it is! As of Summer 2023.
When you’re ready to get your hands on it, you can come back to this post!
Vector Database Quick Start tutorial with Weaviate
Goal:
1️⃣ Connect to Weaviate,
2️⃣ Vectorize a dataset using a given vectorizer,
3️⃣ Perform a search from the vectorized dataset.
Given dataset for this tutorial:
a tiny Jeopardy questions in JSON format
(you don’t have to download this, we’ll call it directly from an url later)
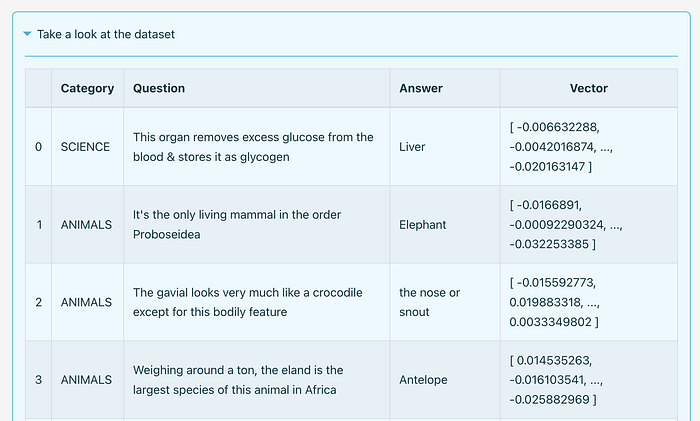
First, in case you haven’t,
1. register(sign up) to Weaviate and create a Cluster. This doesn’t require any coding skills. Follow this official guide with GUI.
2. Also, you will need an API Key to call a vectorizer unless you’re ready to provide your own vector embeddings. This can be HuggingFace(Get one following this official guide), or Cohere, or OpenAI.
3. Next, Create a Jupyter Notebook file(.ipynb) or .py file to run the codes below. I recommend trying these on Jupyter notebook for the easiness of running it in small chunks, following the steps.
Or, start by downloading this Jupyter Notebook I filled in for you. *You will still need your own API keys!
1️⃣ Connect to Weaviate by creating a client instance
import weaviate
import json- The first line imports the
weaviatemodule, which provides the necessary functionalities for interacting with the Weaviate vector database. - The second line imports the
jsonmodule, which is a standard library in Python used for working with JSON data.
client = weaviate.Client(
    url = "https://some-endpoint.weaviate.network",  # Replace with your endpoint
    auth_client_secret=weaviate.AuthApiKey(api_key="YOUR-WEAVIATE-API-KEY"),  # Replace w/ your Weaviate instance API key
    additional_headers = {
        "X-HuggingFace-Api-Key": "YOUR-HUGGINGFACE-API-KEY"  # Replace with your inference API key
    }
)- This code sets up a Weaviate client by creating an instance of the
weaviate.Clientclass. - The
weaviate.Clientclass constructor takes several parameters: url: This parameter should be replaced with the endpoint URL of your Weaviate instance. It specifies the location where your Weaviate instance is running.auth_client_secret: This parameter sets the authentication client secret for the Weaviate instance. You should replace"YOUR-WEAVIATE-API-KEY"with the actual API key for your Weaviate instance.additional_headers: This is an optional dictionary that allows you to provide additional headers for the requests made to Weaviate. In this example, it includes an "X-HuggingFace-Api-Key" header, which you should replace with your Hugging Face inference API key. In this particular tutorial, APIs for creating embeddings and/or connecting to LLMs could be included. Here it suggests you to put HuggingFace Api because we’re going to use HuggingFace’s text2vec vectorizor. More on this later.
Once this code is executed, you will have a client object that you can use to interact with the Weaviate vector database, perform various operations, and access the data stored in Weaviate.
Remember to replace the placeholder values (“https://some-endpoint.weaviate.network", “YOUR-WEAVIATE-API-KEY”, “YOUR-HUGGINGFACE-API-KEY”) with the actual values specific to your Weaviate instance and Hugging Face API key.
- Mind that you should keep the “” and paste your keys inside of the “”.
- You can find the Weaviate url and keys in your Weaviate Console.
With that, our code is ready to call Weaviate (and other !
2️⃣ Vectorize a dataset using a given vectorizor
“Weaviate stores data objects in collections, each of which is called a class. Each object has a set of properties, and a vector representation generated automatically by a vectorizer, or specified at import time.”
class_obj = {
    "class": "Question",
    "vectorizer": "text2vec-huggingface",  # If set to "none" you must always provide vectors yourself. Could be any other "text2vec-*" also.
    "moduleConfig": {
        "text2vec-huggingface": {
            "model": "sentence-transformers/all-MiniLM-L6-v2",  # Can be any public or private Hugging Face model.
            "options": {
                "waitForModel": True
            }
        }
    }
}

client.schema.create_class(class_obj)TLDR: this part of the code sets up the configuration for a Weaviate class called
"Question", using the"text2vec-huggingface"vectorizer and a specific Hugging Face model ("sentence-transformers/all-MiniLM-L6-v2"). It then uses the Weaviate client to create this class in the Weaviate schema.
- This code defines a dictionary object called
class_obj, which represents the configuration for a Weaviate class. It specifies the settings related to the class and the vectorization of its data. - The
"class"key within the dictionary assigns the name"Question"to the class. You can replace"Question"with the desired name for your class. - The
"vectorizer"key determines the type of vectorizer to be used for the class. In this example, it is set to"text2vec-huggingface", which indicates the usage of a Hugging Face model for text vectorization. If you set"vectorizer"to"none", you would need to provide the vectors yourself. Additionally, you can use other"text2vec-*"options as well. - The
"moduleConfig"key provides further configuration options for the vectorizer. Here, it specifies the settings for the"text2vec-huggingface"vectorizer. - Within
"text2vec-huggingface", the"model"key specifies the Hugging Face model to be used for vectorization. In this example, it is set to"sentence-transformers/all-MiniLM-L6-v2", but you can replace it with any public or private Hugging Face model of your choice. - The
"options"key allows additional customization. In this case,"waitForModel"is set toTrue, indicating that the code should wait until the Hugging Face model is fully loaded before proceeding. It helps with the stability when running in batches.
client.schema.create_class(class_obj)create_class()method of the Weaviate client'sschemamodule to create a new class in the Weaviate schema based on theclass_objconfiguration.- The
create_class()method takes theclass_objdictionary that we just created above as an argument and sends it to the Weaviate server to create the class.
Finally, we can load the data and vectorize it, using the vectorizer we defined above. This process can be referred as ‘adding an object’ in Weaviate. We can then access this objects later to manage it or query contents from it.
# Load data
import requests
url = 'https://raw.githubusercontent.com/weaviate-tutorials/quickstart/main/data/jeopardy_tiny.json'
resp = requests.get(url)
data = json.loads(resp.text)

# Configure a batch process
with client.batch(
    batch_size=100
) as batch:
    # Batch import all Questions
    for i, d in enumerate(data):
        print(f"importing question: {i+1}")

        properties = {
            "answer": d["Answer"],
            "question": d["Question"],
            "category": d["Category"],
        }

        client.batch.add_data_object(
            properties,
            "Question",
        )
TLDR; this code loads data from a JSON file hosted on GitHub via provided url, configures a batch process with a batch size of 100 using the Weaviate client, and iterates over the loaded data to import questions into Weaviate. Each question’s properties are extracted from the JSON data, and a custom vector is assigned to the question data object before being added to the batch process.
line-by-line:
# Load data
import requests

url = 'https://raw.githubusercontent.com/weaviate-tutorials/quickstart/main/data/jeopardy_tiny.json'
resp = requests.get(url)
data = json.loads(resp.text)- Imports the
requestsmodule to make HTTP requests - The
urlvariable is constructed using an f-string to specify the URL of the file. In this example, it points to a specific location on GitHub where the file is hosted. If you want to bring your own data, this is where you should be putting them in. I recommend trying with the given example data first to ensure everything else is working! - The
requests.get(url)function sends an HTTP GET request to the specified URL, and the response is stored in therespvariable. - Finally, the
json.loads(resp.text)call parses the response text as JSON and assigns the resulting data to thedatavariable.
with client.batch(
    batch_size=100
) as batch:- This code sets up a batch process using the
batch()method of the Weaviate client. - The
batch_sizeparameter specifies the number of objects to be imported in each batch. In this case, it's set to 100. - Why use batch? For computing efficiency, speed, and atomicity(prevents inconsistant data)! It’s generally recommended for any large-scale data imports, vectorized or not.
  for i, d in enumerate(data):
      print(f"importing question: {i+1}")

      properties = {
          "answer": d["Answer"],
          "question": d["Question"],
          "category": d["Category"],
      }

      custom_vector = d["vector"]
      client.batch.add_data_object(
          properties,
          "Question",
          vector=custom_vector  # Add custom vector
)- The loop iterates over each item in the
datalist, where each item represents a question from the loaded JSON data. Remember, our dataset is bunch of Jeopardy! questions. - The
enumerate(data)function is used to retrieve both the index (i) and the corresponding item (d) from thedatalist. - Every loop, it prints out the question # in order.
- The
propertiesdictionary is created to hold the properties of the question, such as the answer, question text, and category. - The
custom_vectorvariable is assigned to the vector value for the question, which is present in thevectorfield of each item in thedatalist. This value is generated by the vectorizer. - The
client.batch.add_data_object()method is called to add the question data to the batch process. - The
propertiesdictionary is passed as the first argument to provide the property values of the question. - The string
"Question"specifies the class to which the data object belongs. - The
vectorparameter is set tocustom_vector, which assigns the custom vector to the data object.
Now you have a vector database!
3️⃣ Perform a search from the vectorized dataset.
By now you probably have noticed this quick-start tutorial is working with a VERY limited dataset containing only ten jeopardy questions.
But still, we can try the nearText , querying for Jeopardy objects related to biology.
nearText = {"concepts": ["biology"]}

response = (
    client.query
    .get("Question", ["question", "answer", "category"])
    .with_near_text(nearText)
    .with_limit(2)
    .do()
)

print(json.dumps(response, indent=4))
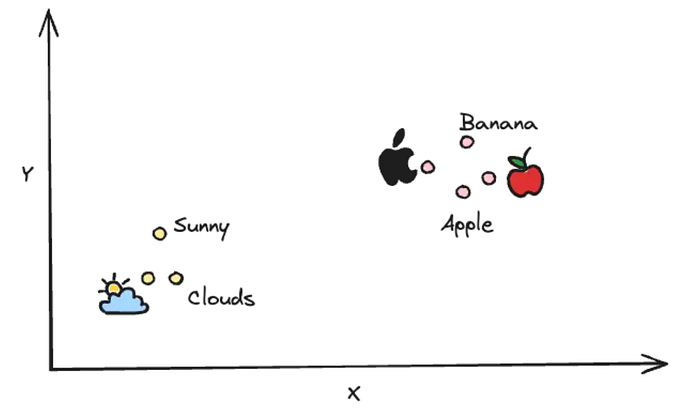
It doesn’t matter if the word ‘biology’ was mentioned or included in the dataset. It will query based on the semantic relationship. You can imagine it placing a dot representing the query keyword(‘biology’) and calculate distance to every datapoints in the vector database, and pulling the top two closest ones.
line-by-line:
nearText = {"concepts": ["biology"]}- This defines a dictionary called
nearTextwith a single key-value pair. - It is used to specify the concept(s) that should be considered in the near text search. aka, the query.
response = (
    client.query
    .get("Question", ["question", "answer", "category"])
    .with_near_text(nearText)
    .with_limit(2)
    .do()
)

print(json.dumps(response, indent=4))- The
client.querystatement initializes a query builder object. .get("Question", ["question", "answer", "category"])specifies that we want to retrieve data from the"Question"class and retrieve the"question","answer", and"category"properties of the objects..with_near_text(nearText)is used to apply the near text search using thenearTextdictionary we defined earlier. It searches for objects related to the concept"biology"..with_limit(2)sets the maximum number of results to 2. Only the top 2 matching objects will be returned..do()executes the query and retrieves the results.- The results are assigned to the
responsevariable. print(json.dumps(response, indent=4)will print the response in JSON string representation. Indent is specified to pretty-print it.- You will see something like this:
{
    "data": {
        "Get": {
            "Question": [
                {
                    "answer": "DNA",
                    "category": "SCIENCE",
                    "question": "In 1953 Watson & Crick built a model of the molecular structure of this, the gene-carrying substance"
                },
                {
                    "answer": "Liver",
                    "category": "SCIENCE",
                    "question": "This organ removes excess glucose from the blood & stores it as glycogen"
                }
            ]
        }
    }
}
The given dataset is VERY limited (only 10 questions included) but you can try other concept such as ‘Zoo’
Yay It’s done!
You have
1️⃣ Connected to Weaviate,
2️⃣ Vectorized a dataset,
3️⃣ Performed a search from the vectorized dataset.
All put together:
import weaviate
import json


# initiate Weaviate Client and set up API keys
client = weaviate.Client(
    url = "https://some-endpoint.weaviate.network",  # Replace with your endpoint
    auth_client_secret=weaviate.AuthApiKey(api_key="YOUR-WEAVIATE-API-KEY"),  # Replace w/ your Weaviate instance API key
    additional_headers = {
        "X-HuggingFace-Api-Key": "YOUR-HUGGINGFACE-API-KEY"  # Replace with your inference API key
    }
)

# Create a data object, 'class' in Weaviate
# Set a vectorizor to use if needed

class_obj = {
    "class": "Question",
    "vectorizer": "text2vec-huggingface",  # If set to "none" you must always provide vectors yourself. Could be any other "text2vec-*" also.
    "moduleConfig": {
        "text2vec-huggingface": {
            "model": "sentence-transformers/all-MiniLM-L6-v2",  # Can be any public or private Hugging Face model.
            "options": {
                "waitForModel": True
            }
        }
    }
}

client.schema.create_class(class_obj)

# Load data
import requests
url = 'https://raw.githubusercontent.com/weaviate-tutorials/quickstart/main/data/jeopardy_tiny.json'
resp = requests.get(url)
data = json.loads(resp.text)

# Configure a batch process
with client.batch(
    batch_size=100
) as batch:
    # Batch import all Questions
    for i, d in enumerate(data):
        print(f"importing question: {i+1}")

        properties = {
            "answer": d["Answer"],
            "question": d["Question"],
            "category": d["Category"],
        }

        client.batch.add_data_object(
            properties,
            "Question",
        )


# Perform nearText Query
# Here we search for Jeopardy questions related to 'biology'
nearText = {"concepts": ["biology"]}

response = (
    client.query
    .get("Question", ["question", "answer", "category"])
    .with_near_text(nearText)
    .with_limit(2)
    .do()
)

print(json.dumps(response, indent=4))
Lastly, I recommend to delete the Class object you just created for this tutorial and clean up your Weaviate cloud, since you will never need the 10 Jeopardy questions in your life ever again.
run:
client.schema.delete_class("Question") 


